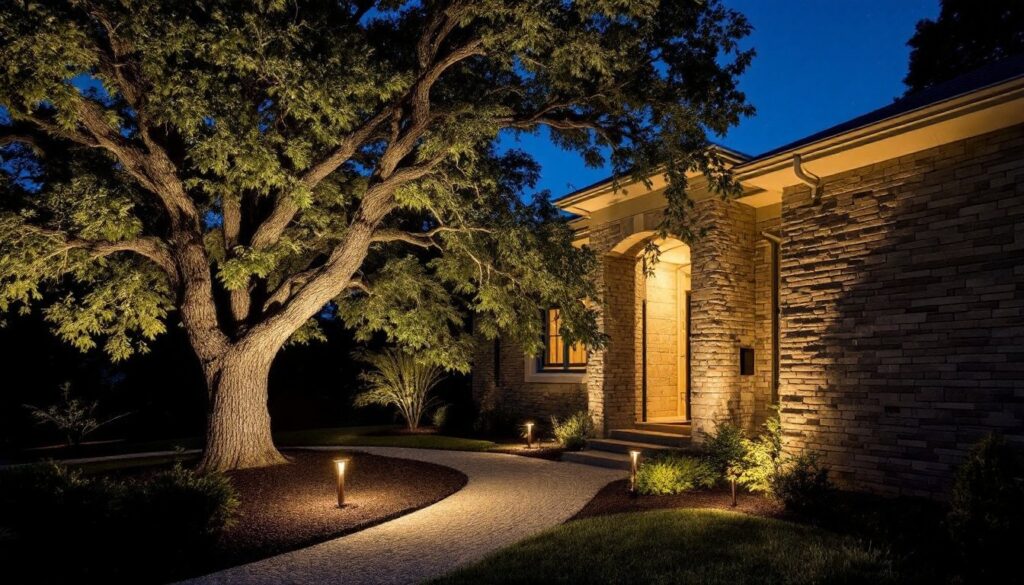
Up lighting creates depth, drama, and dimension in a yard that vanishes after sunset. Unlike path lights or downlights, landscape up lighting throws beams upward to highlight trees, walls, and architectural details, turning flat daytime views into layered nighttime scenes. Whether you’re adding curb appeal, improving security, or simply wanting to enjoy your yard after dark, up lighting delivers visible impact with relatively straightforward installation. Most systems run on low-voltage wiring, which keeps the project accessible for DIYers comfortable with basic electrical tasks.
Table of Contents
ToggleKey Takeaways
- Landscape up lighting creates depth and drama by illuminating vertical features like trees and walls, transforming flat yards into layered nighttime scenes while improving safety and security.
- Low-voltage systems (12V or 24V) are the most accessible option for DIY installation, requiring only a transformer and basic electrical skills without conduit in most jurisdictions.
- Proper placement of up lights—12–24 inches from tree trunks and 6–18 inches from walls—and choosing the right beam angle (15°–45° for most features) are essential to avoid glare and over-lighting.
- LED fixtures with warm white color temperatures (2700K–3000K) outperform halogen by drawing 3–7 watts per fixture instead of 20–50 watts, while lasting 25,000+ hours.
- A well-designed landscape up lighting layout requires a plan sketched before installation, with a transformer sized 25% above total wattage to prevent overheating and allow for future expansion.
- When connecting fixtures, use waterproof wire connectors filled with dielectric grease and test voltage at the farthest fixture—it should read at least 10.8V for optimal performance in a 12V system.
What Is Landscape Up Lighting and Why Use It?
Landscape up lighting positions fixtures at ground level, aiming beams upward to illuminate vertical surfaces. The technique originated in commercial and theatrical lighting, where designers needed to draw attention to specific elements without visible hardware cluttering sightlines.
In residential landscapes, up lights solve several problems at once. They extend usable outdoor hours by making patios and walkways safer after dark. They add depth to flat yards by creating shadows and highlights on tree canopies or stone facades. And they boost security, well-lit yards discourage trespassers and eliminate blind spots near entry points.
Most homeowners install low-voltage systems (12V or 24V), which require a transformer to step down household 120V power. Low-voltage wiring doesn’t require conduit in most jurisdictions, making trenching simpler. Some newer systems use solar-charged batteries or line-voltage fixtures (120V), but those come with trade-offs: solar lights lack consistent brightness on cloudy weeks, and line-voltage installations often require permits and conduit per NEC Article 590.
Up lighting works best when it’s subtle. Overlighting creates glare and washes out the features you’re trying to emphasize. A single well-placed fixture often outperforms three poorly aimed ones.
Types of Landscape Up Lighting Fixtures
Bullet lights (also called spotlights) produce a focused beam, typically 15° to 30° spread. They’re ideal for tall trees or narrow architectural details. Most models use adjustable stakes so you can reposition the angle without re-trenching cable.
Well lights (or in-ground fixtures) sit flush with the soil or hardscape. They’re popular in high-traffic areas because there’s no protruding hardware to trip over or damage with a lawnmower. Well lights require a housing canister buried in the ground, which complicates installation but delivers a cleaner look. Ensure the fixture is rated IP67 or IP68 for water and dust resistance, anything less will corrode within a season.
Floodlights cast a wider beam (60° to 120°), useful for washing large walls or spreading light across broad plantings. They’re less common in up lighting roles because the wide spread can create unwanted spill light into windows or neighbors’ yards.
LED vs. halogen: LEDs dominate the market now due to lower energy draw (typically 3–7 watts per fixture vs. 20–50 watts for halogen) and longer lifespan (25,000+ hours). Halogen bulbs produce a warmer color temperature (2700K–3000K), but LEDs are available in matching warmth if you prefer that tone. Avoid “cool white” LEDs (4000K+) in landscape settings, they create harsh, clinical light that doesn’t complement foliage or stone.
Some systems offer adjustable color temperature or RGB options. These can be fun for seasonal displays, but they add complexity and cost. For most yards, a fixed warm white (2700K–3000K) delivers the best results without ongoing tinkering.
Best Locations for Installing Up Lights in Your Yard
Placement makes or breaks an up lighting design. Random scattering creates visual noise: intentional placement creates layers and focal points.
Trees and Large Shrubs
Position bullet lights 12–24 inches from the trunk, aiming upward into the canopy. For deciduous trees, the winter silhouette of bare branches looks striking when backlit. Evergreens with dense foliage need slightly more power or closer placement to push light through the mass.
Avoid placing fixtures directly against the trunk, this creates a flat wash and highlights imperfections in the bark. Step back a foot or two to let the light graze upward, which emphasizes texture and depth. For multi-trunk specimens like crape myrtles or Japanese maples, use two fixtures at opposing angles (roughly 90° apart) to fill in shadows and create a more three-dimensional effect.
Tall palms or columnar evergreens often need only one fixture centered in front. Mature oaks or maples may require two or three lights spaced around the drip line to cover the full canopy.
Architectural Features and Walls
Stone or brick facades, stucco walls, and wooden pergolas all benefit from up lighting. Place well lights or bullet lights 6–18 inches from the base of the wall, adjusting distance based on wall height and desired beam spread. Textured surfaces (stacked stone, rough-cut timber) look best with grazing light, fixtures positioned close and angled sharply upward to emphasize relief.
Smooth surfaces like painted stucco can handle fixtures placed farther back, which softens the beam and reduces harsh shadows. If the wall has columns, pilasters, or other vertical elements, light those individually rather than flooding the entire surface. This builds rhythm and keeps the design from feeling monotonous.
Entryway columns, arbors, and fences also make good candidates. A pair of up lights flanking a gate or front door adds symmetry and improves visibility for guests. Just be mindful of glare, if fixtures shine directly into sightlines from the driveway or sidewalk, they’ll blind visitors instead of welcoming them.
How to Choose the Right Up Lighting for Your Landscape
Start with a lighting plan. Walk your yard at dusk and note which features you want to emphasize. Sketch a rough diagram showing fixture locations, cable runs, and the transformer position. This prevents over-buying and keeps installation efficient.
Wattage and lumen output: A single tree or wall feature typically needs 3–7 watts (200–500 lumens) per fixture in an LED system. Larger trees or taller walls may require 8–12 watts (600–900 lumens). Avoid the temptation to overpower, more lumens don’t always mean better results. Landscape lighting relies on contrast, not total brightness.
Beam angle: Narrow beams (15°–25°) work for tall, narrow targets. Medium beams (30°–45°) suit most trees and walls. Wide beams (60°+) are useful for broad plantings but risk spill light into unintended areas.
Transformer capacity: Add up the total wattage of all planned fixtures and choose a transformer rated at least 25% higher than that sum. For example, if you’re running ten 5-watt fixtures (50 watts total), use a 75-watt or 100-watt transformer. This headroom prevents overheating and allows for future expansion. Most transformers include a photocell and timer, so lights turn on at dusk and off at a set hour.
Cable gauge: Low-voltage systems use 12 AWG or 14 AWG landscape wire. For runs over 50 feet, use 12 AWG to minimize voltage drop. Voltage drop causes fixtures farthest from the transformer to dim. If you’re running a long home with landscape design projects, consider splitting circuits or using a multi-tap transformer to balance load.
Material durability: Look for brass, copper, or powder-coated aluminum housings. Plastic fixtures deteriorate under UV exposure and temperature swings. Lenses should be tempered glass, not acrylic, which yellows and cracks over time.
DIY Installation Guide for Landscape Up Lighting
Safety first: Even low-voltage systems originate from 120V household power. Turn off the circuit breaker before connecting the transformer. Wear gloves and safety glasses when digging or cutting wire.
Tools and materials you’ll need:
- Low-voltage transformer (sized to your total wattage)
- Landscape up lights (bullet or well lights)
- 12 AWG or 14 AWG landscape cable
- Wire connectors (waterproof gel-filled or grease-filled types)
- Flat-blade shovel or trenching spade
- Wire strippers
- Voltage tester
- Measuring tape
- Stakes or spray paint (for marking fixture locations)
Step-by-step installation:
-
Map your layout. Use stakes or spray paint to mark fixture positions and cable routes. Run cable along natural edges, bed lines, fence bases, or under mulch, to keep trenches tidy.
-
Mount the transformer. Install it on an exterior wall near a GFCI-protected outlet, ideally within 10 feet of the first fixture. Mount it at least 12 inches above grade to prevent water intrusion. Some transformers are weatherproof and can mount outdoors: others require a covered location. Check manufacturer specs.
-
Trench the cable. Dig a trench 6–8 inches deep along your marked route. Most codes don’t require conduit for low-voltage cable, but burying it protects against shovel strikes and freeze-thaw damage. If crossing a driveway or high-traffic area, sleeve the cable in PVC conduit for extra protection.
-
Connect fixtures. Strip ½ inch of insulation from the main cable at each fixture location (don’t cut the cable, just strip a section). Use waterproof connectors to join the fixture leads to the main run. Twist connections firmly and fill with dielectric grease before capping. Poor connections are the top cause of fixture failures.
-
Position and aim fixtures. For bullet lights, press stakes into soil at the marked spots and angle the head toward the target. For well lights, dig a canister-sized hole, set the housing level with the surrounding grade, and backfill. Aim the beam before final burial.
-
Test the system. Plug the transformer into the outlet and switch it to manual mode. Check that all fixtures light up and the beams hit the intended targets. Adjust angles as needed. Use a voltage tester at the farthest fixture, it should read at least 10.8V (for a 12V system). If voltage is low, upsize the cable gauge or split the circuit.
-
Bury and mulch. Once everything works, backfill trenches and tamp soil lightly. Lay mulch or sod over the disturbed areas. Leave a small service loop (6–12 inches of slack cable) at each fixture for future adjustments or bulb changes.
-
Program the timer. Set the transformer’s timer to turn lights on at dusk and off after your typical outdoor hours, most homeowners choose a 4–6 hour window. This conserves energy and extends bulb life. For more tips on outdoor projects, resources like The Spruce offer seasonal maintenance guides.
When to call a pro: If your installation requires running new 120V circuits, trenching through hardscape, or meeting specific code requirements for line-voltage systems, hire a licensed electrician. Permits may be needed for any work that ties into your main electrical panel. Structural lighting on multi-story facades or high-voltage theatrical rigs also warrant professional design and installation. For detailed mounting techniques and fixture types, hardscaping guides provide additional planning resources.
Maintenance: LED fixtures need little upkeep, but clean lenses annually to remove mineral deposits and dirt. Check wire connections every few years, corrosion or moisture intrusion can degrade performance. Replace mulch carefully around well lights to avoid burying them or blocking the beam.

