The difference between a builder-grade bathroom and one that feels finished often comes down to the fixtures flanking or surrounding the mirror. Poor lighting creates shadows where you need visibility most, right when you’re shaving, applying makeup, or checking whether that shirt really matches your pants. Good bathroom mirror lighting eliminates those shadows, provides even illumination across your face, and ties together the room’s design. Whether you’re updating a half-bath or tackling a full remodel, getting the lighting right isn’t just about aesthetics, it’s about function, safety, and making your morning routine a whole lot easier.
Table of Contents
ToggleKey Takeaways
- Proper bathroom mirror lighting eliminates shadows and provides even illumination across your face, making grooming tasks accurate and your morning routine easier.
- Task lighting at the mirror should deliver 75–100 lumens per square foot (roughly 4,000–5,000 lumens total for a standard 60-inch double vanity) with bulbs rated at 3000K–3500K for accurate skin tone rendering.
- Sconces positioned 60–66 inches from the floor and spaced 36–40 inches apart provide the most flattering, shadow-free illumination compared to top-mounted light bars.
- Bathroom mirror lighting fixtures must meet National Electrical Code requirements, with damp or wet ratings depending on proximity to water sources—a critical safety and compliance consideration.
- Undersizing fixtures is the most common mistake; match your lighting to mirror dimensions (two sconces or a 24–30-inch bar for single sinks, four sconces or a 48–54-inch bar for double sinks).
- LED bulbs and integrated LED fixtures cost more upfront but eliminate frequent bulb replacement and provide superior energy efficiency compared to incandescent or CFL alternatives.
Why Bathroom Mirror Lighting Matters
Overhead lighting casts shadows down your face, turning grooming tasks into guesswork. That’s why dedicated mirror lighting exists, it provides cross-illumination that fills in shadows and gives you accurate color rendering for tasks that demand precision.
Task lighting at the mirror should deliver 75–100 lumens per square foot for a typical vanity area. That translates to roughly 4,000–5,000 lumens total for a standard 60-inch double vanity. Underpowered fixtures force you to compensate with harsh overhead lights, which defeat the purpose.
Color temperature matters too. Bulbs rated at 3000K–3500K (warm white to neutral white) render skin tones accurately without the sterile glare of cool daylight bulbs. Go too warm (2700K), and you’ll misjudge makeup shades: too cool (4000K+), and you’ll look washed out.
Beyond function, mirror lighting defines the visual hierarchy of the space. Well-placed sconces or a thoughtfully sized light bar frame the mirror and balance the room’s proportions. Poor placement, like a single fixture centered above the mirror, creates a spotlight effect that’s unflattering and impractical.
Finally, bathrooms present unique electrical challenges. Fixtures must be rated for damp or wet locations depending on proximity to showers and tubs. The National Electrical Code (NEC) requires GFCI protection for bathroom outlets and careful spacing of fixtures near water sources. This isn’t cosmetic work, it’s governed by code, and it’s worth doing right the first time.
Types of Bathroom Mirror Lighting
Sconces and Wall-Mounted Fixtures
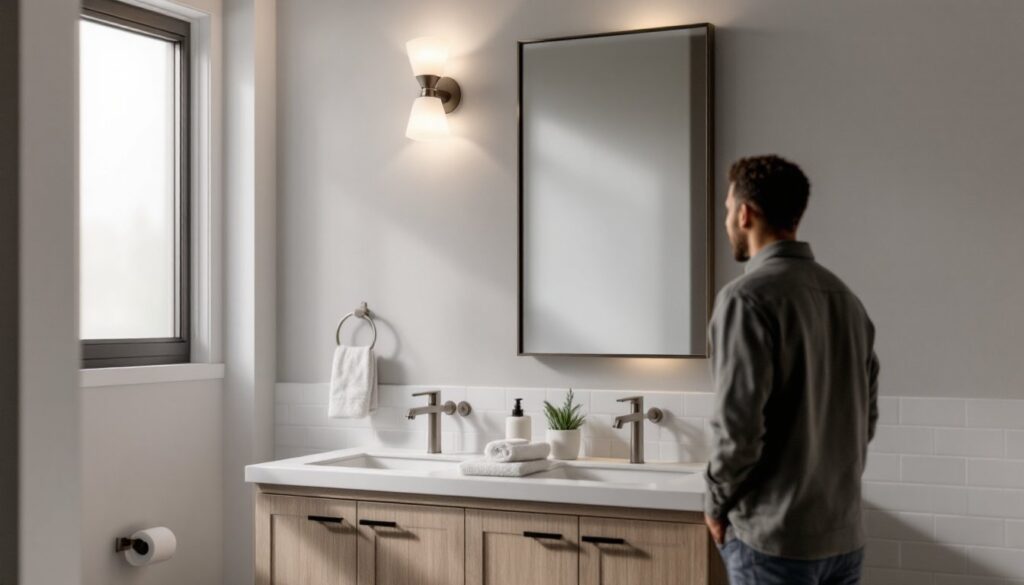
Sconces mounted on either side of the mirror provide the most flattering, shadow-free illumination. Position them 60–66 inches from the floor to the center of the fixture, or roughly at eye level for most adults. Space them 36–40 inches apart for a single-sink vanity, wider for doubles.
Look for sconces with opal or frosted glass shades to diffuse the light evenly. Clear glass with exposed bulbs creates hot spots and glare. Backplates should be proportional to the mirror and vanity size, oversized sconces on a small pedestal sink look clumsy: undersized ones on a sprawling double vanity disappear.
Most sconces use standard E26 medium-base bulbs, giving you flexibility to choose LED, CFL, or incandescent. LED bulbs rated at 800–1000 lumens per fixture (roughly 60W-equivalent) are a solid baseline. If your sconces are purely decorative and underpowered, you’ll need supplemental lighting.
Vanity Light Bars
A light bar mounted above the mirror is the builder-grade default, and it can work if sized and positioned correctly. The fixture should span 75% of the mirror width to provide even coverage. Mount it 75–80 inches from the floor, leaving about 6 inches of clearance between the top of the mirror and the fixture.
Choose a fixture with multiple bulbs or a continuous LED strip. A single-bulb fixture creates the same top-down shadow problem as overhead lighting. For a 48-inch vanity, a four-bulb bar or integrated LED delivering 3000–4000 lumens total provides adequate task lighting.
Vanity bars are easier to install than sconces if you’re replacing an existing fixture, the junction box is already in place. But they’re less forgiving in terms of shadow control, which is why pairing them with over sink kitchen lighting techniques in adjacent spaces creates visual continuity without sacrificing function.
Backlit and LED Mirror Lighting
Backlit mirrors integrate LED strips behind or within the mirror itself, casting a soft glow around the perimeter. This creates ambient lighting and a modern aesthetic but rarely provides sufficient task lighting on its own. Pair backlit mirrors with sconces or a light bar for functional illumination.
Edge-lit mirrors use LEDs embedded in the mirror’s edge, while backlit mirrors position LEDs behind a frosted panel or around the perimeter. Both typically operate on 12V or 24V DC power, requiring a driver or transformer hidden in the wall or vanity cabinet.
Installation is more involved than standard fixtures. You’ll need to run power to the mirror location (often requiring an electrician) and ensure the driver is accessible for future replacement. Most backlit mirrors are hardwired, though some plug-in models exist for retrofits.
LED mirrors often include smart home features like dimming, color temperature adjustment, and touch controls. These add convenience but also complexity, more components mean more potential failure points. Choose mirrors with replaceable LED modules rather than sealed units: when the LEDs eventually fail (typically after 30,000–50,000 hours), you’ll want the option to replace them without scrapping the entire mirror.
How to Choose the Right Bathroom Mirror Lighting
Start with your mirror dimensions and vanity size. For a single sink (24–36 inches wide), two sconces or a 24–30-inch light bar works. For double sinks (60–72 inches), you’ll need four sconces (two per sink) or a 48–54-inch light bar. Undersizing fixtures is the most common mistake, proportion matters.
Next, assess your existing electrical setup. If you’re replacing a fixture, check whether the junction box is centered above the mirror or offset. Centered boxes work for light bars but not sconces. Adding sconces means running new wire from the existing box or pulling a new circuit from the panel, both require cutting into walls.
Consider your ceiling height and mirror placement. Standard 8-foot ceilings provide limited vertical space: oversized fixtures can feel cramped. In rooms with 9+ foot ceilings, you have more flexibility to upsize fixtures and add visual weight without crowding.
Match the finish to your faucets, drawer pulls, and towel bars. Polished chrome, brushed nickel, matte black, and oil-rubbed bronze are common, and mixing metals is acceptable as long as you’re intentional about it. Two finishes max per bathroom keeps things cohesive.
Wet vs. damp ratings matter. Fixtures within 3 feet horizontally and 8 feet vertically of a tub or shower need a damp rating at minimum. Directly above a tub or inside a shower enclosure requires a wet rating. Check the fixture’s UL listing, it’ll specify which zones it’s rated for.
Bulb type affects both upfront cost and long-term value. Integrated LED fixtures cost more initially but eliminate bulb replacement for years. Fixtures with replaceable bulbs cost less and offer flexibility, but you’ll buy bulbs every few years. If you go with replaceable bulbs, choose LED over CFL or incandescent for better efficiency and color stability.
Finally, factor in dimming. A dimmer lets you dial down brightness for late-night trips or when you want ambient lighting. Not all LED fixtures are dimmable, and not all dimmers work with LEDs, verify compatibility before buying. Lutron and Leviton make reliable LED-compatible dimmers: cheap no-name units cause flickering.
Installation Tips for Bathroom Mirror Lighting
Safety first: Shut off power at the breaker, not just the switch. Use a non-contact voltage tester to confirm the circuit is dead before touching any wires. Bathrooms are wet environments: even a brief shock can be fatal.
If you’re replacing an existing fixture with a similar one (light bar for light bar, sconce for sconce), installation is straightforward. Remove the old fixture, connect the new one’s wires to the existing junction box (black to black, white to white, bare copper to ground), mount the fixture, and restore power. If your new fixture is significantly heavier than the old one, verify the junction box is properly braced. Retrofit fan-rated boxes can be installed from below if you need better support.
Adding sconces where none existed is a bigger job. You’ll need to run 14/2 or 12/2 NM cable from the existing light box (or a new circuit) to two new junction boxes at sconce height. This means cutting drywall, fishing wire through studs or down from the attic, installing boxes, patching and painting, and possibly pulling a permit depending on local code. If you’re not comfortable with this, hire a licensed electrician, botched electrical work is a fire hazard and an insurance nightmare.
When mounting sconces, measure carefully and mark centerlines with a level. Use a stud finder to avoid drilling into pipes or existing wiring. If the sconce location doesn’t align with a stud, use drywall anchors rated for the fixture’s weight, toggle bolts or snap toggles work well for hollow walls.
For backlit mirrors, plan wire routing before hanging the mirror. Most require a junction box behind or adjacent to the mirror, often hidden in the wall cavity. Mark the box location, cut a hole for a standard single-gang box, and run power from the nearest switch or receptacle. The mirror’s driver or transformer typically mounts to the box or sits loose in the cavity: leave enough slack in the wire for future service.
When working near tile, drill slowly with a carbide-tipped masonry bit to avoid cracking. Place painter’s tape over the drill point to prevent the bit from wandering. If you’re mounting to tile, use plastic anchors or toggle bolts, screws alone won’t hold in grout.
After installation, test all functions, switches, dimmers, and any integrated controls. Check for flickering, which indicates a dimmer compatibility issue or loose connection. Flickering isn’t just annoying: it stresses the LEDs and shortens their lifespan.
Finally, clean up. Patch any drywall carefully, matching texture and paint. Poor patchwork telegraphs through flat paint and undermines an otherwise pro-looking install. If you cut into tile or disturbed caulk lines, re-caulk with a mildew-resistant silicone caulk rated for wet areas.
Most jurisdictions require a permit for new circuits or significant electrical work. Replacing a fixture one-for-one typically doesn’t, but adding new boxes or circuits does. Permits aren’t red tape, they ensure an inspector verifies your work meets code. That’s peace of mind worth the $50 fee.

