Adding an outdoor fan with integrated lighting transforms a patio, porch, or pergola from a seasonal space into a year-round extension of the home. These dual-function fixtures move air, drop perceived temperatures by 8–10°F, and eliminate the need for separate overhead lights or table lamps. Whether someone’s hosting evening dinners or reading on a screened porch, a well-chosen outdoor ceiling fan with light does the heavy lifting. This guide breaks down ratings, motor specs, installation realities, and design options to help homeowners pick and install the right unit without guesswork or wasted trips to the return counter.
Table of Contents
ToggleKey Takeaways
- Outdoor fans with lighting combine climate control and ambient lighting in one fixture, reducing installation costs and energy consumption compared to separate AC units and overhead lights.
- Wet-rated outdoor fans with sealed motors and stainless steel hardware are essential for fully exposed patios, pergolas, and coastal areas, while damp-rated options work for covered porches where rain doesn’t reach the fixture directly.
- Blade span and motor type significantly impact performance—choose 44–52 inches for standard patios and prioritize DC motors over AC motors for quieter operation and smart home integration.
- Proper installation requires a fan-rated electrical box mounted to a ceiling joist, outdoor-rated wiring with waterproof connectors, and local code compliance for GFCI protection near water sources.
- Modern outdoor ceiling fans with lights offer diverse design styles from traditional to coastal and industrial, with customizable LED color temperatures and smart features like voice control and motion sensors.
Why Outdoor Fans with Lighting Are a Smart Home Investment
Outdoor fans with lights combine climate control and task lighting in one fixture, reducing hardware clutter and installation labor. A single electrical box serves both functions, cutting material and permit costs compared to running separate circuits for a fan and light.
Energy efficiency is a real advantage. Modern DC motor fans draw 30–70 watts at medium speed, less than most incandescent porch lights, while LED light kits add only 12–20 watts. Over a summer season, that translates to $15–25 in electricity costs versus window AC units that can run $100+ monthly for a single room.
Resale value gets a quiet boost. Outdoor living spaces with functional ceiling fans and lighting consistently rank high with buyers, especially in warm climates. A properly installed wet-rated fan signals that the seller invested in quality upgrades, not just cosmetic touches.
From a practical standpoint, these fans extend usable hours on patios and decks. Instead of retreating indoors at dusk when bugs arrive or heat lingers, homeowners keep entertaining or relaxing outside. The downlight provides enough lumens for dining, grilling, or reading without the harsh glare of security floodlights.
Key Features to Look for in Outdoor Ceiling Fans with Lights
Not all outdoor fans are built the same. The right fixture depends on exposure, ceiling height, and how hard the fan will work. Here’s what separates a reliable unit from one that fails after two seasons.
Weather Resistance and Durability Ratings
UL rating is non-negotiable. Look for:
• Damp-rated fans for covered porches, screened enclosures, or gazebos where rain doesn’t reach the fixture directly.
• Wet-rated fans for fully exposed decks, pergolas with open slats, or coastal areas where salt spray and driving rain are common.
Wet-rated models use sealed motors, stainless steel hardware, and weatherproof wiring. Damp-rated fans cost less but will corrode or short out if mounted in true outdoor conditions. Don’t gamble on ratings, check the UL label on the box.
Material matters. ABS plastic blades resist warping and fading better than wood or fabric. Powder-coated aluminum or galvanized steel housings handle humidity without rust. Avoid fans with exposed wood or unsealed metal components unless they’re under a fully enclosed porch.
Many outdoor ceiling fans now include impact-resistant glass or polycarbonate light covers, which survive hail, flying debris, and the occasional errant baseball better than bare bulbs.
Motor Performance and Blade Span Considerations
Blade span should match the space. Standard guidelines:
• 36–42 inches: Small balconies or breakfast nooks (up to 100 sq ft)
• 44–52 inches: Standard patios or covered decks (100–225 sq ft)
• 54–60 inches: Large pergolas or outdoor kitchens (225–400 sq ft)
• 60+ inches: Commercial or oversized residential spaces
Undersized fans run constantly and never move enough air. Oversized fans in tight spaces create turbulence and noise.
Motor type affects longevity and control. AC motors are cheaper upfront but noisier and less efficient. DC motors cost $50–100 more but run quieter, offer more speed settings, and integrate with smart home systems or remote controls. In outdoor spaces where ambient noise is low, think screened porches or courtyards, the hum of an AC motor becomes annoying fast.
CFM (cubic feet per minute) measures airflow. For outdoor use, look for at least 4,000 CFM on a 52-inch fan. Higher is better in open or humid areas where air needs real circulation, not just a gentle breeze.
Light output typically ranges from 1,200 to 2,500 lumens with integrated LED kits. That’s enough for dining or task lighting but not spotlight-bright. If someone plans to use the space for detailed work, grilling, crafts, reading fine print, add supplemental fixtures or choose a fan with an uplight/downlight combination.
Best Outdoor Spaces for Installing Fans with Lighting
Outdoor fans with lights work best where people spend extended time, not just pass through. Here’s where they deliver real value:
Covered patios and porches are the most common install. A standard 8–9-foot ceiling works well with flush-mount or short-downrod models. If the ceiling is tongue-and-groove wood or beadboard, confirm there’s blocking or a structural beam above before mounting. Drywall anchors won’t hold a 30–50 lb fan long-term.
Screened enclosures benefit from damp-rated fans that keep bugs out while moving air. Since screens block some breeze, a fan compensates without opening doors or windows. Mount the fan centered over seating areas, not near the door where it disrupts entry/exit.
Pergolas and pavilions need wet-rated fans due to partial or full weather exposure. If the pergola has an open-slat roof, rain will hit the fan. Use a wet-rated model with a sealed motor and corrosion-resistant finish. For large pergolas, consider two smaller fans instead of one oversized unit to avoid dead zones.
Outdoor kitchens and dining areas benefit from fans with bright, dimmable LED lights. Position the fan so blades don’t interfere with tall guests or hanging plants. If the grill is directly below, mount the fan offset to avoid grease buildup on blades and motor housing.
Gazebos and cabanas often have non-standard ceiling shapes (vaulted, angled, or octagonal). Use an adjustable-angle mounting bracket or canopy adapter. Some manufacturers offer sloped-ceiling kits that work up to 25–30 degrees.
Don’t install fans in fully open areas with no overhead structure, wind will fight the blades, strain the motor, and create unsafe wobble. If the space is exposed, build a simple overhead frame or use freestanding fans instead.
Installation Tips for Outdoor Ceiling Fans with Lights
Installing an outdoor fan with lights requires more than swapping out a light fixture. Plan for structure, wiring, and weather exposure.
Start with the electrical box. Standard plastic “pancake” boxes aren’t rated for fan weight or vibration. Replace it with a metal fan-rated box (labeled for 50–70 lbs) secured to a ceiling joist or blocking. If there’s no joist where the fan needs to go, install a fan brace bar through the ceiling, these expand between joists and support up to 70 lbs without opening the ceiling.
Check local codes. Most jurisdictions require GFCI protection for outdoor outlets and fixtures within 6 feet of a water source (pool, hot tub, outdoor sink). Even if the fan is farther away, some inspectors require GFCI for any outdoor electrical work. If unsure, consult the local building department before starting.
Use outdoor-rated wiring and connectors. Standard wire nuts can corrode in humid environments. Use waterproof wire connectors with heat-shrink tubing or silicone-filled caps. If running new wiring, use UF-B (underground feeder) cable rated for wet locations, even if it’s overhead. NM-B (Romex) isn’t rated for damp or wet areas and will fail inspection.
Mount the fan securely. Follow the manufacturer’s downrod length recommendation based on ceiling height. For 8–9-foot ceilings, a flush mount or 6-inch downrod works. For 10+ foot ceilings, use a 12–24 inch downrod to bring the blades into the optimal 8–9 foot range above the floor. Blades too high don’t move air effectively: too low creates a head-knock hazard.
Balance and test. After wiring and mounting, turn the fan on at each speed. If it wobbles, use the included balancing kit, small weights that clip onto blade edges. Test the light function separately: if it flickers, check wire connections and confirm the LED driver isn’t loose.
Seal penetrations. If the fan is mounted to an exposed wood ceiling or soffit, caulk around the mounting canopy with clear exterior-grade silicone to prevent water intrusion. Don’t rely on the canopy alone, wind-driven rain finds gaps.
For wet-rated fans in coastal areas, apply a thin coat of dielectric grease to wire connections inside the canopy before final assembly. This prevents corrosion from salt air and extends motor life.
Safety note: Always turn off power at the breaker, not just the switch, before working on ceiling fans. Use a non-contact voltage tester to confirm wires are dead. Outdoor installations often share circuits with other fixtures, so double-check.
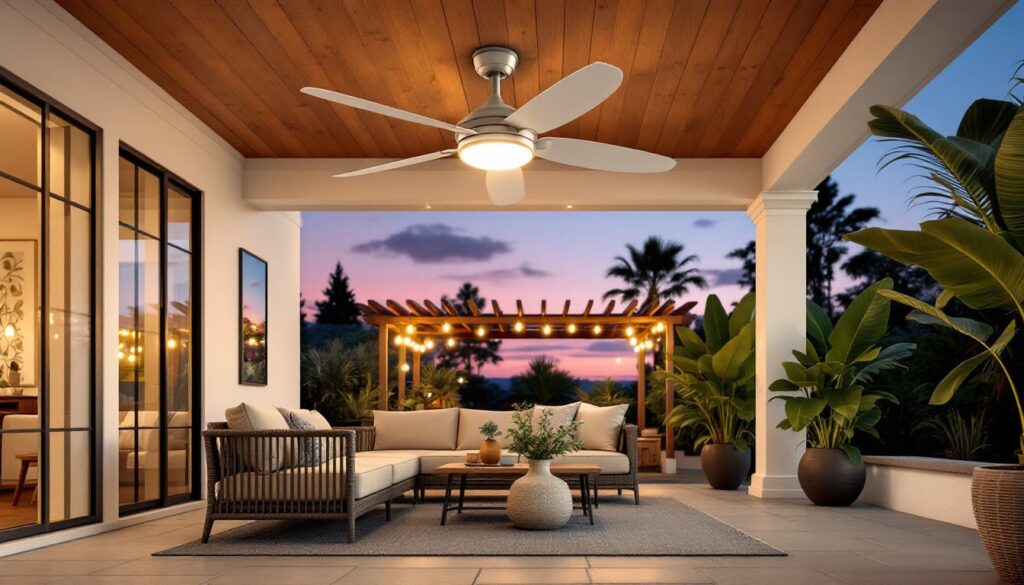
Style and Design Options to Match Your Outdoor Decor
Outdoor fans no longer default to basic white or builder-grade bronze. Current options span traditional, modern, coastal, and industrial styles, each with finish and blade choices to match porch aesthetics.
Traditional styles feature ornate motor housings, wood-look blades, and frosted glass shades. These suit Southern-style porches with rocking chairs, bead board ceilings, and painted trim. Look for fans in oil-rubbed bronze, aged brass, or matte black finishes that complement classic architecture.
Modern and contemporary fans use clean lines, minimal hardware, and integrated LED arrays instead of visible bulbs. Brushed nickel, titanium, or matte white finishes pair well with stucco exteriors, flat-roof pergolas, and minimalist outdoor furniture. Some models skip traditional blades entirely, using enclosed impellers or bladeless designs for a sleek look.
Coastal and nautical styles incorporate galvanized metal, rope-wrapped downrods, and weathered wood or white blades. These fans suit beach houses, lakefront decks, or any space with a relaxed, weathered vibe. Wet-rated construction is standard in this category since buyers expect full weather exposure.
Rustic and industrial fans feature exposed hardware, barn-style light cages, and dark matte finishes. Blades might be distressed wood, galvanized metal, or black ABS. These work well with timber-frame pergolas, stone patios, or outdoor spaces that extend from farmhouse or loft-style interiors.
Blade finish and pitch matter beyond looks. Dark blades absorb heat and may warp in direct sun: light-colored or reflective blades stay cooler. Blade pitch (angle) typically ranges from 12 to 15 degrees, higher pitch moves more air but requires a stronger motor. Most outdoor fans land at 13–14 degrees for a balance of airflow and efficiency.
Light kit options include single downlights, multi-bulb chandeliers, and uplight/downlight combos. For ambiance, choose warm-white LEDs (2700–3000K). For task lighting, go with daylight LEDs (4000–5000K). Many kits now include dimming via remote or wall control, adding flexibility for different uses.
Some manufacturers offer interchangeable light kits and blade sets, allowing homeowners to update the look without replacing the entire fan. This works well for rental properties or anyone who likes seasonal decor changes.
Remote controls and smart integration are increasingly standard. Basic remotes handle on/off, speed, and light dimming. Smart fans integrate with Alexa, Google Assistant, or Apple HomeKit for voice control and automation. Connecting fans to motion sensors or timers extends convenience, automatically turning on at sunset or when someone steps onto the porch is more practical than fumbling for a switch. For design inspiration and outdoor living trends, The Spruce offers room-specific guides that pair fan styles with furniture and finishes.

