Pendant lights aren’t just for kitchens and dining rooms anymore. These versatile fixtures are taking bathrooms by storm, offering focused task lighting, visual interest, and a chance to break away from the builder-grade vanity bar. Whether someone’s tackling a full remodel or just swapping out outdated fixtures, pendant lighting can elevate a bathroom from purely functional to genuinely stylish. But bathrooms come with unique challenges: moisture, electrical codes, and tight clearances that demand careful planning before drilling the first hole or cutting power.
Table of Contents
ToggleKey Takeaways
- Pendant lighting in bathrooms provides focused task lighting, saves wall space, and elevates design compared to traditional vanity bars and recessed fixtures.
- Mount bathroom pendants 30–40 inches above the countertop for vanities and ensure wet-rated fixtures (IP65 or higher) if installed near tubs or showers to comply with electrical codes.
- Choose moisture-resistant finishes like brushed nickel or oil-rubbed bronze, glass shades, and bulbs with 75–100W equivalent output and 3000–4000K color temperature for accurate grooming light.
- Pendant lighting installations require proper ceiling box support rated for fixture weight, correct wire gauge connections, and GFCI protection considerations to ensure safety in wet bathroom environments.
- Avoid common mistakes like ignoring moisture ratings, hanging fixtures too low or high, skipping dimmers, and mismatching bulb temperatures to ensure code compliance and optimal bathroom aesthetics.
- Hire a licensed electrician for complex installations, always verify local electrical codes before starting, and obtain necessary permits for new circuits or junction box moves.
Why Choose Pendant Lights for Your Bathroom?
Traditional bathroom lighting, think horizontal vanity bars or recessed cans, gets the job done, but pendant lights bring both form and function to the table. They deliver concentrated, downward-directed light exactly where it’s needed, whether that’s illuminating a sink basin or highlighting architectural details.
Pendants free up wall space that bulky sconces would otherwise occupy, making them ideal for narrow or oddly shaped bathrooms. In powder rooms or guest baths with limited square footage, a single well-placed pendant can serve as both task lighting and a focal point without overwhelming the room.
From a design perspective, pendants introduce vertical lines and varied materials, glass, metal, rattan, even concrete, that add texture and dimension. They’re particularly effective in bathrooms with high ceilings (9 feet or taller), where recessed lights alone can leave the space feeling cavernous. Many homeowners exploring pendant options discover that hanging fixtures draw the eye upward, creating the illusion of greater height even in standard 8-foot ceiling bathrooms.
Pendants also offer flexibility in bulb choice. Unlike integrated LED vanity bars, most pendant fixtures accept standard Edison-base bulbs (E26 sockets), making it easy to swap in daylight-spectrum bulbs for makeup application or warm white for a spa-like ambiance.
Best Locations for Bathroom Pendant Lighting
Placement makes or breaks a pendant installation. Poor positioning can create shadows, obstruct sightlines, or violate electrical codes. Here’s where pendants work best and what to watch for.
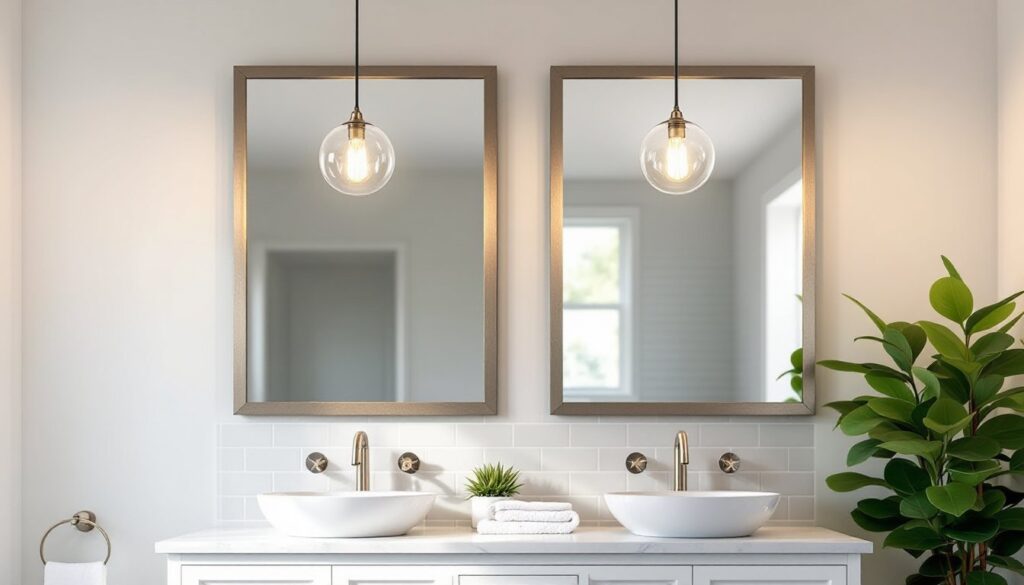
Over the Vanity
Hanging pendants flanking or centered above a vanity mirror is the most common configuration. For double sinks, mount one pendant over each basin, centered approximately 30–36 inches apart. The bottom of the fixture should hang 30–40 inches above the countertop, high enough to avoid head bumps but low enough to direct light downward where it’s useful for grooming tasks.
For single-sink vanities narrower than 48 inches, a centered pendant works well, though some designers prefer asymmetrical placement slightly to one side with a complementary sconce on the opposite wall. This approach works when vanity width or mirror placement makes centered mounting awkward.
Avoid common pitfalls: Don’t hang pendants directly in front of a mirror where they’ll block the user’s reflection. Side-mounting or slightly offset positioning prevents this. Also, ensure at least 3 inches of clearance from any light fixture to a water source per NEC guidelines, this typically isn’t an issue over vanities, but it matters near tubs.
If the bathroom features task lighting in other spaces like kitchens, similar principles apply: concentrate light where hands work, not where heads pass.
Above the Bathtub
Pendants over freestanding or alcove tubs create a dramatic statement, but they require careful attention to wet location ratings and clearance requirements. The National Electrical Code (NEC) Section 410.10 prohibits standard fixtures within 8 feet vertically from the top of a bathtub rim unless they’re specifically rated for wet or damp locations.
For wet-rated pendants (IP65 or higher), manufacturers seal electrical components against direct water spray. Look for listings that explicitly state “suitable for use in tub and shower areas.” These tend to cost 20–40% more than standard pendants but are non-negotiable for code compliance.
In practical terms, most ceiling heights (96 inches standard) allow pendants over tubs if the fixture itself is compact. A pendant with a 12-inch drop and 8-inch fixture body will sit at roughly 76 inches from the floor, just within the safe zone above a standard tub rim (14–16 inches high). Always verify local codes, as some jurisdictions impose stricter rules.
Centerline the pendant over the tub’s length, not its width, to avoid creating shadows along the user’s body. Dimmer switches are almost mandatory here: nobody wants interrogation-room lighting during a soak. Many bathroom design portfolios showcase pendants with frosted or seeded glass shades that diffuse light gently across the space.
Choosing the Right Pendant Style for Your Bathroom
Moisture, space constraints, and lighting needs narrow the field considerably. Not every pendant that works in a dining room belongs in a bathroom.
Material matters. Opt for finishes that resist humidity and temperature swings: brushed nickel, oil-rubbed bronze, powder-coated steel, or sealed brass. Avoid raw iron, unsealed wood, or fabric shades unless the bathroom has exceptional ventilation, an exhaust fan rated at least 50 CFM (cubic feet per minute) for bathrooms under 100 square feet.
Glass shades (clear, frosted, or seeded) are bathroom workhorses. They’re easy to wipe down, won’t absorb moisture, and come in countless shapes. Mini-pendants with 5–8-inch diameter shades work well in compact spaces, while larger 10–12-inch globes suit master baths with higher ceilings.
Consider light output and color temperature. For task lighting over vanities, aim for bulbs delivering 75–100 watts incandescent equivalent (about 1100–1600 lumens) per pendant in 3000–4000K (warm to neutral white). Color rendering index (CRI) above 90 ensures makeup colors and skin tones appear accurate.
If the bathroom has existing recessed lighting or a window, pendants can supplement rather than provide all illumination. In windowless powder rooms, pendants become the primary light source, choose fixtures that allow maximum bulb wattage (typically 60–100W equivalent LED).
Style coordination: Match pendant finish to faucets, cabinet hardware, and towel bars for visual cohesion. In transitional or farmhouse-style bathrooms, matte black or antique brass pendants pair well with shiplap and freestanding tubs. Modern baths call for sleek glass globes with chrome or brushed nickel hardware.
Homeowners seeking fixture inspiration often browse curated design galleries that show pendants in real-world bathroom settings, helping visualize scale and proportion before purchasing.
Installation Tips and Safety Considerations
Bathroom pendant installation isn’t a beginner-level electrical project, but competent DIYers with basic wiring knowledge can handle it. This is wet-location electrical work, mistakes create shock and fire hazards. When in doubt, hire a licensed electrician.
Before starting, kill power at the breaker (not just the switch) and verify it’s dead with a non-contact voltage tester. Bathrooms often share circuits with other rooms: test the existing junction box to confirm which breaker controls it.
Box support is critical. Standard plastic “old-work” boxes aren’t rated for fixtures heavier than a few pounds. Most glass pendants weigh 3–8 pounds: metal or multi-light fixtures can exceed 10 pounds. Use a metal ceiling box rated for at least 15 pounds if replacing an existing fixture, or install a fan-rated box (supports up to 50 pounds) anchored to a ceiling joist if running new wiring.
To locate a joist, use a stud finder or drill small pilot holes 16 inches apart (standard joist spacing). If the desired pendant location doesn’t align with a joist, install a ceiling fan brace bar between joists, these adjustable metal bars span 16–24 inches and provide solid mounting without opening drywall extensively.
Wiring steps:
- Feed the pendant’s supply wire through the box nipple or canopy.
- Connect black (hot) to black, white (neutral) to white, and bare copper (ground) to the box’s ground screw using wire nuts rated for the wire gauge (typically 14 or 12 AWG).
- Secure connections with electrical tape and tuck wires neatly into the box before attaching the canopy.
- Damp or wet-rated fixtures often include rubber gaskets, don’t skip these: they seal the canopy against moisture intrusion.
Pendant height adjustment: Most fixtures include adjustable cord or chain. Measure from the ceiling to the desired bottom height, then cut excess carefully. For corded pendants, the excess gets looped inside the canopy: for chain, remove links with pliers (save extras in case adjustments are needed later).
GFCI protection: The NEC requires ground-fault circuit interrupter protection for bathroom receptacles, but ceiling fixtures are exempt if they’re more than 6 feet from a tub or shower. Still, installing the bathroom lighting circuit on a GFCI breaker adds a layer of safety, especially in older homes without dedicated bathroom circuits.
PPE: Wear safety glasses (ceiling work drops debris into eyes), and use a sturdy stepladder, not a wobbly stool. If working near a tub, lay down drop cloths to protect the finish from dropped tools.
Many DIYers who’ve worked on kitchen pendant installations find bathroom projects similar, though moisture ratings add complexity.
Common Mistakes to Avoid with Bathroom Pendant Lighting
Even experienced DIYers trip up on bathroom pendants. Here’s what goes wrong and how to avoid it.
Ignoring moisture ratings. The biggest mistake: installing a “dry location only” fixture in a bathroom. Check the label inside the canopy or on the box. Bathrooms with enclosed showers and good exhaust fans can sometimes use damp-rated (IP44) fixtures, but anywhere within the tub/shower zone demands wet-rated (IP65 or IP67). When budgets are tight, it’s better to choose a wet-rated fixture and save money elsewhere than risk code violations or fixture failure.
Hanging too low or too high. Too low creates head-banging hazards: too high defeats the purpose of task lighting. The 30–40-inch rule (measured from countertop to fixture bottom) works for most vanity heights (32–36 inches). Taller users might prefer 36–40 inches: shorter users can go as low as 28 inches if head clearance isn’t an issue.
Skipping dimmers. Pendant lights with exposed bulbs or clear glass can be blindingly bright at full power. A CFL/LED-compatible dimmer (not an old incandescent dimmer) gives control over ambiance and reduces energy use. Lutron Diva and Leviton Decora are reliable options in the $15–$25 range.
Mismatched bulb temperatures. Mixing 2700K warm white in recessed cans with 5000K daylight in pendants creates a disjointed, unflattering look. Stick to one color temperature throughout the bathroom, or at least within the same zone (vanity area vs. tub area).
Undersized wiring or boxes. Bathrooms built before the 1990s sometimes have 14 AWG wire on 20-amp circuits (code violation) or shallow pancake boxes that can’t accommodate modern pendants with bulky drivers or junction points. If the existing box is less than 1.5 inches deep, replace it with a 2.5-inch-deep remodel box before hanging the pendant.
Forgetting about bulb access. Glass globe pendants look great until the bulb burns out and someone realizes the shade doesn’t unscrew easily. Choose fixtures with user-friendly bulb replacement, threaded glass, hinged panels, or removable bottom caps.
Poor coordination with other fixture types. If the bathroom has recessed lights, wall sconces, and now pendants, ensure they’re on separate switches or a multi-scene dimmer system. Nobody wants all lights blaring during a 2 a.m. visit.
No permit when required. Adding a new electrical circuit or moving a junction box often requires a permit and inspection, even for DIY work. Check with the local building department. In many jurisdictions, simply replacing a fixture on an existing box doesn’t require a permit, but running new wire does. Homeowners planning extensive lighting updates, like those found in low-ceiling kitchen projects, should clarify permit requirements early.
Finally, don’t rush the install. Bathroom electrical work done carelessly can lead to moisture intrusion, arcing, or breaker trips. Take time to seal connections, verify ratings, and test everything before calling the job complete.

