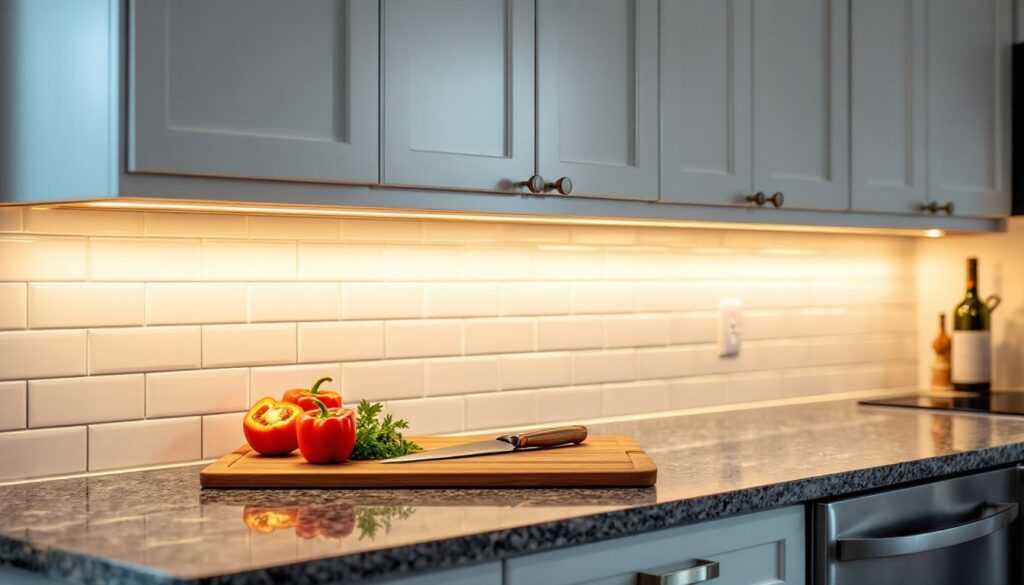
Ever tried dicing onions in your own shadow? Poor kitchen lighting turns simple tasks into frustrating exercises in guesswork. Under counter lighting, also called under cabinet lighting, solves this problem by targeting work surfaces with direct, shadow-free illumination exactly where you prep, chop, and cook.
Adding lighting beneath wall cabinets isn’t just about visibility. It makes kitchens safer, more functional, and genuinely more enjoyable to use. Whether you’re retrofitting an existing kitchen or planning a remodel, this guide walks through the fixture types, selection criteria, and practical considerations that’ll help you light your countertops like a pro.
Table of Contents
ToggleKey Takeaways
- Under counter lighting eliminates shadows and improves task visibility by positioning light directly beneath wall cabinets, making food prep safer and more enjoyable than relying on overhead fixtures alone.
- LED strip lights, puck lights, and linear bar lights each offer different benefits—strips are flexible and affordable, pucks target specific zones, and bars provide seamless coverage for professional-grade installations.
- Proper brightness for under counter lighting requires 150 to 300 lumens per linear foot, with color temperature between 3000K and 4000K for accurate food preparation and natural appearance.
- Most under counter lighting systems use low-voltage (12V or 24V) transformers for safety and cooler operation, with installation ranging from simple adhesive peel-and-stick to hardwired setups requiring electrical knowledge.
- Dimmer switches compatible with your transformer and fixtures enable under counter lighting to function as both task illumination and ambient accent lighting while reducing energy consumption.
- Careful surface prep, accurate measurements of cabinet runs, and attention to fixture spacing prevents installation errors and ensures professional-looking results without gaps or uneven brightness.
Why Under Counter Lighting Transforms Your Kitchen
Under counter lighting delivers targeted task illumination that overhead fixtures simply can’t match. Ceiling lights cast shadows directly onto countertops when you stand at the workspace, your body blocks the light right where you need it most. Fixtures mounted beneath wall cabinets eliminate this issue by projecting light downward from the front edge of the counter, creating shadow-free work zones.
Beyond function, these fixtures add visual depth and ambiance. When dimmed in the evening, they provide soft accent lighting that highlights backsplashes and countertop materials without the harsh glare of overhead cans. This layered approach is central to modern kitchen recessed lighting strategies that combine ambient, task, and accent sources.
The safety factor matters, too. Proper task lighting reduces eye strain and makes detailed work, reading recipe measurements, checking meat doneness, spotting spills, significantly easier. For homeowners with aging eyes or households where multiple cooks share space, the improvement in visibility is immediate and measurable.
Installation varies from plug-and-play simple to hardwired projects requiring basic electrical knowledge. Most under counter fixtures run on low-voltage DC power (12V or 24V) supplied by a transformer, which makes them safer and cooler than line-voltage alternatives. If you’re comfortable running cable and making wire connections inside a junction box, many systems are within DIY reach. Projects involving new circuits or modifications to existing wiring should involve a licensed electrician to meet National Electrical Code (NEC) requirements and local permitting rules.
Types of Under Counter Kitchen Lighting
Choosing the right fixture type depends on your cabinet layout, desired light quality, and how much you want to spend. Each style has distinct strengths and installation quirks.
LED Strip Lights: Flexible and Energy-Efficient
LED strip lights (also called tape lights) consist of flexible circuit boards embedded with small LEDs, typically sold in reels of 16 feet or longer. They’re thin, usually under 1/4 inch, so they tuck invisibly along the underside of cabinets.
Strips come in various color temperatures measured in Kelvin (K). For task lighting, look for 3000K to 4000K (warm white to neutral white). Lower temps skew yellow: higher temps feel clinical. Color Rendering Index (CRI) matters here: aim for CRI 90+ so food colors look accurate and surfaces render naturally.
Installation is straightforward. Most strips have adhesive backing, peel and stick along the front rail of the cabinet underside. Important: Clean the surface with isopropyl alcohol first. Grease or dust kills adhesion. Many DIYers add small cable clips or aluminum channels for extra hold and a cleaner look. Channels also diffuse hot spots, creating a more uniform light stripe.
Power comes from a plug-in or hardwired transformer. Strips are cuttable at marked intervals (usually every 2 to 4 inches), so you can customize lengths to fit each cabinet run. Solderless connectors make it easy to link multiple sections or navigate corners.
One downside: cheaper strips suffer from uneven brightness and color shift over time. Stick with reputable manufacturers and check warranty terms. Quality strips should last 50,000+ hours with minimal degradation.
Puck Lights: Focused Task Illumination
Puck lights are small, round or square fixtures (typically 2 to 4 inches in diameter) that mount individually under cabinets. They deliver concentrated pools of light rather than continuous coverage.
They’re a good fit for kitchens with shorter cabinet runs or where you want to highlight specific work zones, say, over a coffee station or prep sink. Spacing matters: place pucks 8 to 12 inches apart to avoid dark gaps between fixtures. Too far apart and you’ll get obvious bright spots with shadows in between.
Pucks install via surface-mount screws or adhesive pads. Surface-mount models are more secure and allow angled aiming if your counters aren’t perfectly level. Like strips, most pucks run on low-voltage power supplied by a transformer.
One caution: pucks tend to show more glare if mounted near the front edge of the cabinet without a trim bezel or diffuser. Position them slightly toward the back (but not so far that they cast shadows at the backsplash), or choose models with frosted lenses.
Battery-powered puck lights exist, but they’re best reserved for closets or temporary setups. Battery life is short under daily kitchen use, and the light output dims noticeably as batteries drain.
Linear Bar Lights: Seamless Coverage
Linear bar lights are rigid fixtures ranging from 12 to 48 inches in length, often with integrated LED arrays. They mount end-to-end beneath cabinets for continuous, uniform illumination without visible gaps or hot spots.
Bars are the go-to for professional-grade installations. They’re brighter and more durable than adhesive strips, and many models offer features like touch dimming, motion sensors, or smart-home integration. Build quality is usually superior, extruded aluminum housings with excellent heat dissipation.
Installation requires screws and sometimes mounting brackets. Most bars link together via short connector cables, so you can run multiple units off a single transformer. Hardwired bars often daisy-chain inside the cabinet, keeping wiring hidden.
Bar lights work especially well in small kitchen lighting plans where every lumen counts and fixture placement must be precise. They’re also a smart choice when cabinets are already installed and you want a cleaner look than tape lights provide.
Downside: bars are pricier per linear foot than strips, and they’re less forgiving if your cabinet widths are non-standard. Measure carefully before ordering, most manufacturers sell bars in fixed lengths, though some offer linkable modular systems.
All three types pair well with dimmer switches. Low-voltage LED dimmers are required for most under counter systems, standard incandescent dimmers cause flickering or won’t work at all. Confirm compatibility between your transformer, fixtures, and dimmer to avoid frustration.
How to Choose the Right Under Counter Lighting for Your Kitchen
Picking fixtures isn’t just about aesthetics. You need to match light output, fixture type, and installation method to your space and skill level.
Measuring Your Space and Brightness Needs
Start by measuring the linear footage of cabinets you want to light. Use a tape measure along the front edge of the cabinet underside, noting any gaps for appliances, open shelving, or hood vents. Don’t guess, accuracy here prevents ordering too much or too little.
Brightness (measured in lumens) depends on countertop color and ambient light levels. As a rule of thumb, aim for 150 to 300 lumens per linear foot of counter. Darker countertops absorb more light and need the higher end of that range: lighter surfaces reflect well and can get by with less.
For a typical 10-foot run of cabinets, you’re looking at 1,500 to 3,000 total lumens. Check fixture specs carefully, lumens per foot vary widely between products. A quality LED strip might deliver 200 lumens per foot, while bargain versions output half that.
Color temperature choice affects mood and function. 3000K feels warm and inviting, similar to halogen. 4000K is neutral white with better color accuracy for food prep. Avoid anything above 5000K unless you’re running a lab, it’s too blue and harsh for residential kitchens. Some galley kitchen lighting designs blend multiple temps, but for under counter applications, consistency across all fixtures looks best.
Don’t overlook beam angle. Strips and bars typically offer 120-degree spread, which is ideal for counters. Pucks may have narrower beams (60 to 90 degrees), requiring tighter spacing to avoid gaps.
Dimming capability is worth the small upcharge. Dimmed under counter lights double as evening accent lighting and reduce energy use when full brightness isn’t needed. Ensure your chosen fixtures, transformer, and dimmer switch are all compatible, mismatched components cause flickering, buzzing, or total failure.
If your cabinets have a front lip or light rail, you may need recessed or thin-profile fixtures. Measure the available clearance between the cabinet bottom and the lip. Strips and low-profile bars fit almost anywhere: bulky pucks may not.
Finally, consider installation method. Plug-in systems are easiest, just mount fixtures, run a low-voltage cable to a transformer, and plug into an outlet. Ideal for renters or anyone avoiding electrical work. Hardwired systems require running cable through walls or cabinet backs and connecting to a switched circuit. More permanent and cleaner (no visible cords), but requires comfort with electrical work or a licensed electrician. In jurisdictions where electrical permits are required for new circuits, budget time and cost for inspections.
Think about controls, too. A simple wall switch works, but smart switches, motion sensors, or wireless remotes add convenience. Some modern LED systems integrate with home automation platforms for scheduling and voice control. Resources like The Kitchn offer design inspiration that can help you visualize how various lighting choices affect overall kitchen aesthetics.
For additional design ideas and real-world examples, checking out collections from sites like Homify’s under-cabinet lighting gallery can spark inspiration and show how different fixture types look in finished kitchens. If you’re after editorial guidance on blending form and function, Remodelista’s under-cabinet lighting guide walks through both product recommendations and design principles.
One often-overlooked detail: PPE during installation. Wear safety glasses when drilling into cabinets and cutting metal channels. If you’re fishing wire through walls, gloves protect your hands from splinters and sharp edges inside stud bays.
Budget varies widely. Basic LED strip kits start around $30 to $50 for a 6-foot section with transformer. Mid-range linear bars run $60 to $120 per fixture. High-end smart systems with dimming and color tuning can top $200+. Installation costs add $150 to $500 if hiring an electrician, depending on complexity and regional rates. Permits, if required, add another $50 to $150.
Most importantly, don’t skip prep. Surface prep is critical for adhesive-mount fixtures. Even slight grease or dust compromises bond strength. Similarly, if hardwiring, confirm your circuit can handle the additional load, though LED fixtures draw minimal current, older kitchens with maxed-out circuits may need an electrician to add a dedicated line.
Matching your lighting choices to your specific cabinet dimensions, countertop material, and installation comfort level ensures you’ll get professional-looking results without frustration or rework.

